- Meta Pixel: The Original Workhorse of Meta Tracking
- Meta Conversions API (CAPI): A Server-Side Power Boost
- Meta Pixel vs. Conversions API: What’s the Difference?
- The Best of Both Worlds: Redundant Setup
- How Event Tracking Changes the Targeting Game
- How to Set Up Meta Pixel
- How to Set Up Meta Conversions API (CAPI)
- Conclusion
Have you ever set up a Meta campaign, only to question whether your conversions were being tracked properly? With browser restrictions and privacy updates disrupting the way ad platforms collect data, choosing the right tracking setup has become more important than ever.
If you’re running sales objective campaigns—or any performance-focused Meta ads—you’ve likely encountered two options: Meta Pixel and Conversions API (CAPI). But which one should you use? And what happens if you just install one but not the other?
In this guide, we’ll explore the differences between Meta Pixel and Conversions API, how each works, and why the most effective advertisers often use both. By the end, you’ll know how to set up your event tracking the right way and unlock better optimization, targeting, and reporting.
Meta Pixel: The Original Workhorse of Meta Tracking
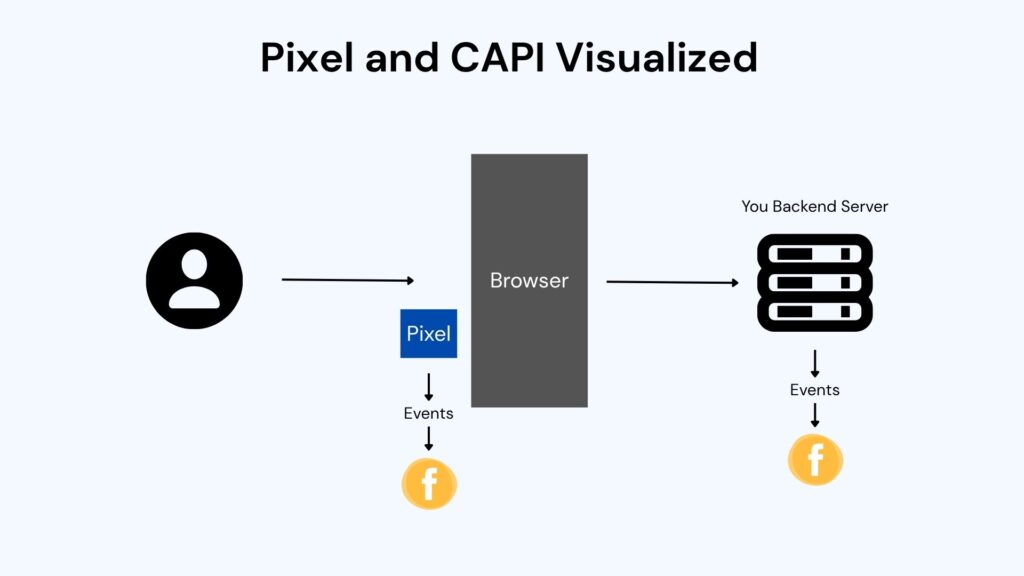
The Meta Pixel is a small piece of JavaScript code you install on your website. When a user visits your site or completes an action (like viewing a product, initiating checkout, or making a purchase), the Pixel sends that information back to Meta Ads Manager.
Why it matters:
The Pixel is the most common way advertisers send conversion events to Meta. It plays a critical role in optimizing sales objective campaigns by telling Meta what’s working. Without it, Meta can’t attribute purchases, optimize for conversions, or build retargeting audiences.
What the Pixel tracks:
- Page views
- Add to carts
- Checkouts initiated
- Purchases
- Custom conversions
But here’s the problem:
Browser-side tracking (like the Pixel) is now limited. Safari and Firefox block third-party cookies by default, and even Chrome is phasing them out. Add in ad blockers and iOS privacy changes, and the Pixel alone is no longer reliable.
Meta Conversions API (CAPI): A Server-Side Power Boost

The Conversions API (CAPI) was Meta’s answer to declining browser reliability. Instead of relying on user browsers to send event data, CAPI lets your server talk directly to Meta’s server.
What it does:
CAPI captures many of the same events as the Pixel—but server-side. That means it’s not subject to browser restrictions or ad blockers. CAPI helps you recover lost events and close the attribution gap.
Why it was introduced:
- To improve data accuracy in a privacy-focused world
- To future-proof conversion tracking as browsers evolve
- To give advertisers control over the data they send to Meta
You can send CAPI events using platforms like Shopify, WordPress, Segment, or directly via custom code. Most platforms now have native integrations.
Meta Pixel vs. Conversions API: What’s the Difference?

While both Meta Pixel and Conversions API aim to track the same conversion events, the way they work—and what they rely on—is fundamentally different.
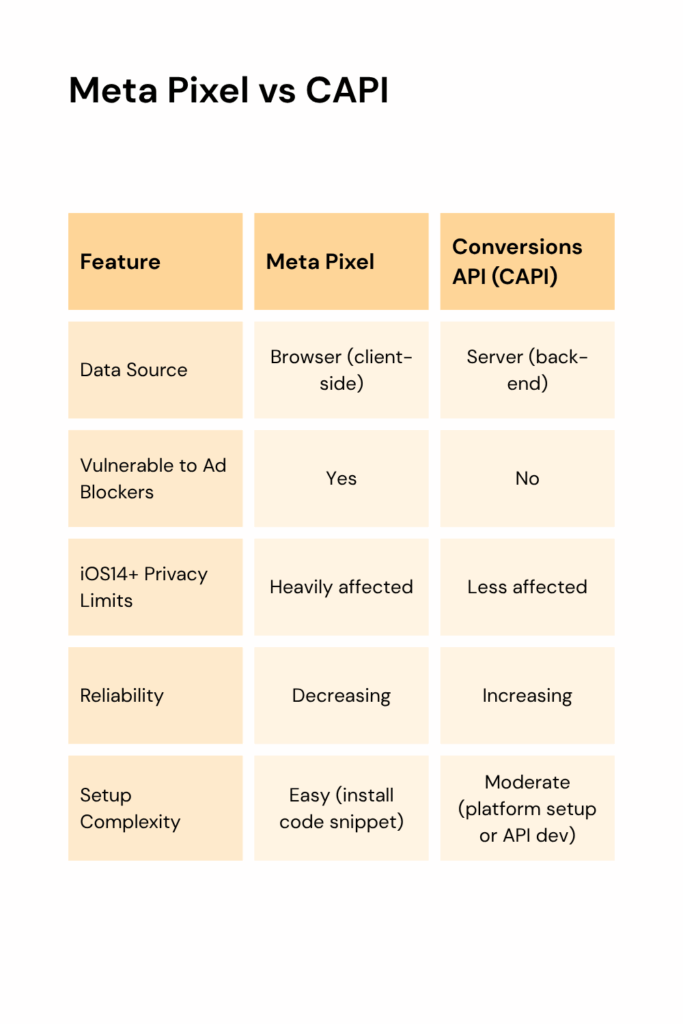
The Meta Pixel operates through the user’s browser. It’s a piece of code that fires when someone takes an action on your website, such as viewing a page or making a purchase. Because it’s client-side, it’s exposed to browser limitations, ad blockers, and privacy restrictions like those introduced with iOS14. That means some events simply won’t make it back to Meta, especially as browser privacy measures continue to evolve.
The Conversions API (CAPI), on the other hand, works server-side. Instead of relying on the user’s device, it sends event data directly from your server to Meta’s. That makes it far less vulnerable to things like tracking prevention or connection issues. It’s more durable and accurate—especially in today’s privacy-first environment.
In short:
- The Pixel is easier to set up but increasingly less reliable on its own.
- CAPI is more accurate but requires a more technical setup.
- The Pixel relies on cookies and browser activity.
- CAPI connects data directly from your backend systems.
Meta doesn’t suggest choosing one over the other. Instead, the recommended approach is to run both together. That way, you have a dual path for event delivery. If one method fails or is blocked, the other acts as a backup—and Meta can deduplicate the data so it’s not counted twice. It’s the most complete, future-proof setup available.
The Best of Both Worlds: Redundant Setup
Running Pixel and CAPI together gives Meta two independent streams of event data. Meta then deduplicates events using the event ID and timestamp so that you don’t double count conversions.
Why this matters:
Sales objective campaigns on Meta need clean, reliable event data to optimize performance. When Meta doesn’t receive enough conversion events—or receives incomplete ones—it struggles to exit the learning phase, hurts ROAS, and misfires on targeting.
A redundant setup:
- Maximizes event match quality
- Restores full-funnel tracking (especially after iOS14.5)
- Improves delivery and conversion accuracy
- Gives you more robust performance reporting
How Event Tracking Changes the Targeting Game
If you think tracking is just about attribution, think again. Your event data feeds Meta’s targeting algorithm.
Meta builds your lookalike audiences, retargeting lists, and ad optimization around the events you send back. If you’re missing purchases or initiating checkouts, Meta can’t build effective segments.
With strong tracking, you can:
- Build smarter lookalikes based on real converters
- Retarget drop-offs with personalized messaging
- Optimize for high-value events, not just clicks
Broad targeting might get you scale, but conversion data is what refines it.
How to Set Up Meta Pixel
- Go to Events Manager in your Meta Business Suite.
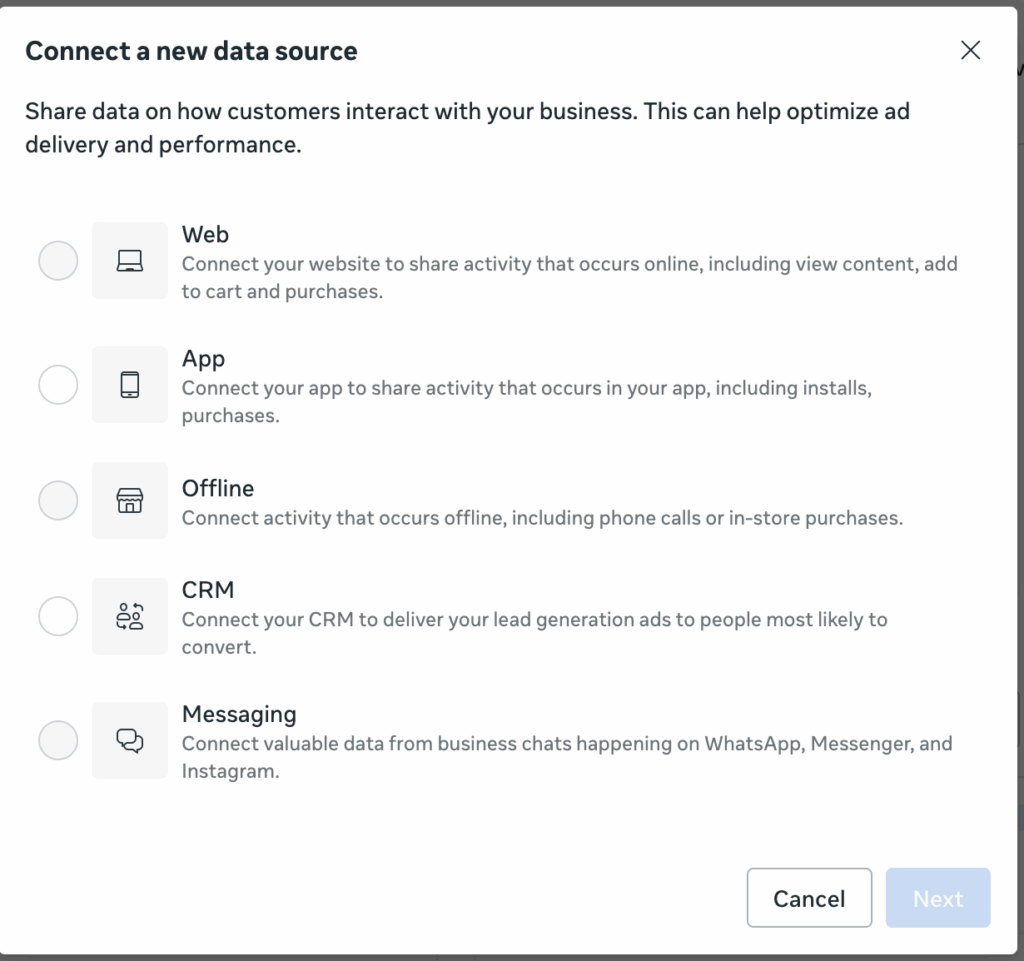
- Select “Connect Data Sources” > “Web” > “Meta Pixel”.

- Name your Pixel and enter your website URL.
- Choose between manual code install or partner integration (e.g., Shopify, WordPress).
- Place the Pixel base code on every page, ideally in the
<head>tag. - Add standard events (like “Purchase” or “AddToCart”) with Meta’s Event Setup Tool or by manually coding.

How to Set Up Meta Conversions API (CAPI)
There are a few ways to do this depending on your platform:
Option 1: Partner Integration (e.g., Shopify, WooCommerce)
- Go to Events Manager > Connect Data Source > Web > Conversions API.
- Select your platform (e.g., Shopify).
- Follow the on-screen steps to authenticate and connect.
Option 2: Manual Setup (Custom Server or Tag Manager)
- Use Meta’s Conversions API Gateway for easier deployment.
- Or build a direct server-to-server connection using the Meta Graph API.
- Assign each event a unique event ID to enable deduplication with Pixel.
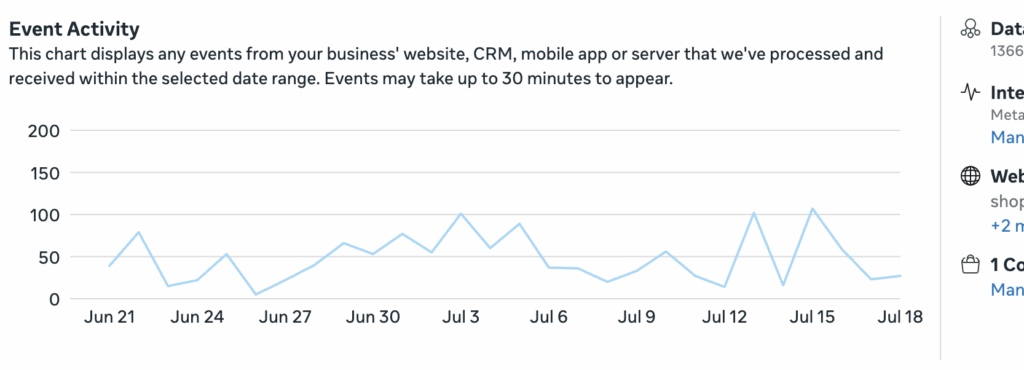
- Test in Events Manager to ensure it’s firing correctly.
Option 3: Use a CDP or Integration Platform (e.g., Segment)
Ideal for more advanced stacks that already handle event collection centrally.
Conclusion
Meta Pixel and Conversions API are both essential tools in your tracking arsenal—but they serve different roles. The Pixel is fast and easy to implement but limited by modern browser restrictions. CAPI offers durability and accuracy but requires more setup.
If you’re serious about running Meta sales campaigns—especially with rising CACs and tighter privacy rules—you need both. The combination gives Meta the best chance to optimize your ads, match users accurately, and report performance clearly.
Final tip:
Don’t wait until you’re troubleshooting poor results. Set up both tracking methods now so you can confidently scale with clean, accurate data.


